Infinite Databases with Nomad and Traefik
I managed to spin up multiple PostgreSQL databases on the fly, each with their own unique URL. Inspired by Neon, PlanetScale and Railway.
Important: There will be a few editable strings in this post. Modify these
anywhere they appear and they will all synchronize: [[$EC2_IP_ADDRESS]],
[[$POSTGRES_JOB_ID]], [[$HOSTNAME]], [[$POSTGRES_USER]],
[[$POSTGRES_PASSWORD]], [[$POSTGRES_DB]], [[$NOMAD_TOKEN]].
I'm no SQL wizard but I enjoy working with databases a lot — I myself am a PostgreSQL and DynamoDB fan. I've always viewed databases as tablestakes for any application since every good one has some sort of basic data persistence requirement.
I have also admired newer fully managed database-as-a-services (DaaS) like Neon and PlanetScale, as well as platform-as-a-services, with database additions, like Railway, Heroku, and most recently Vercel. However, I haven't really used these since the need to has never came up, and I've always been conformtable with cloud-provider options like AWS RDS.
My work to-date has really only necessitated a production, staging, and sandbox database at most, and provisioning these — it has always taken place in AWS via Terraform — has always been viewed as a non-trivial, heavy-handed action (this excludes click-ops). And maybe it's just who I am, but I have always been curious about how to spin up multiple databases on the fly, like Heroku Postgres, but on cloud infrastructure that I owned.
I finally did it.
The goal#
My goal was to create some sort of system for rapidly provisioning
databases on demand. This "system" could be anything from a few
Makefile commands that wrap other tools, to a fully baked
provisioning engine... obviously though, I leaned towards
simplicity and less work.
The loose constraints I imposed on myself were that the databases had to run on infrastructure I owned, they must be accessible from the public internet via unique URL, and they had to be created quickly. For reference, simply creating AWS RDS instances takes 5-10 minutes, which is unacceptably slow.
If you've used any of the previously mentioned managed database offerings, you'll likely have some sense of what I'm aiming for, as you'll have seen the multiple database URLs that you receive, like:
user@ep-ancient-credit-000000.us-west-2.aws.neon.tech/main-> Kevin's databasecontainers-us-west-103.railway.app-> Not Kevin's databaseaws.connect.psdb.cloud/db-one-> Stranger's database
The approach#
The approach that I'm about to lay out is not intended to be secure, durable, or fault tolerant. And while it can, in theory, scale to an infinite number of databases, the upper bound of the actual number of databases is limited to the storage, CPU, and memory limits of the EC2 instance(s) that I run.
Going into this, I had already ruminated on potential solutions for some time. I knew Nomad and its Docker driver would make it a breeze to run PostgreSQL containers, but I had never understood how to handle the networking or routing, or in other words, "connect the pieces".
Luckily, and I don't remember exactly how, I discovered Traefik which would take care of all of my routing needs. Routing was probably the most complex and nebulous piece to me personally.
So, Nomad, Docker, and Traefik were going to be the three core components of my approach.
Some other tools and technical callouts:
- I used a single AWS EC2
t2.largeinstance (that's ~$67/month for you pricing nerds out there) for running everthing: the Nomad server, Docker, and Traefik plus PostgreSQL containers.- I initially ran a
t2.microbut I think it hit memory limits after the first PostgreSQL container.
- I initially ran a
- I used Packer to create an Amazon machine image (AMI) — what the EC2 instance boots up with — with Nomad and Docker pre-installed.
- AWS Route53 for DNS and subdomain routing.
The easy parts#
What went well or felt like a breeze
- Automatic service discovery and routing with Traefik — this part is pure magic
- Running a Nomad job —
nomad run ./traefik.nomad.hcl- Running a PostgreSQL Nomad job is extremely fast
- Learning Traefik through their Docker Compose example
The hard parts#
What was difficult or felt like slog
- Writing a Nomad job spec. While this is just
HCL, the Nomad-isms are unique enough that this is basically learning a new configuration format. - Trafik's tag syntax in Nomad job specs
- Navigating Nomad documentation
- Navigating the Nomad UI — I don't understand 95% of the information displayed.
- No dedicated guide; Figuring out things by trial and error
- Too many ways to do certain things, like passing a static configuration to Traefik...
- You can mount a real host system file
- You can use Nomad's
templatestanza - You can pass container command arguments
UI and architecture#
The intended user interface is a PostgreSQL connection string. This is not novel or different than that of any other database provider. (Though, where the good ones shine is in their splendid end-to-end experience — beautiful web interfaces, documentation, CLI tools, SDKs, APIs, etc. — everything else that accompanies that string.)
For this effort, I as an end user would be perfectly happy with a usable connection string.

Through a little bit of backwards working I laid out the architecture that supports the proposed user experience.
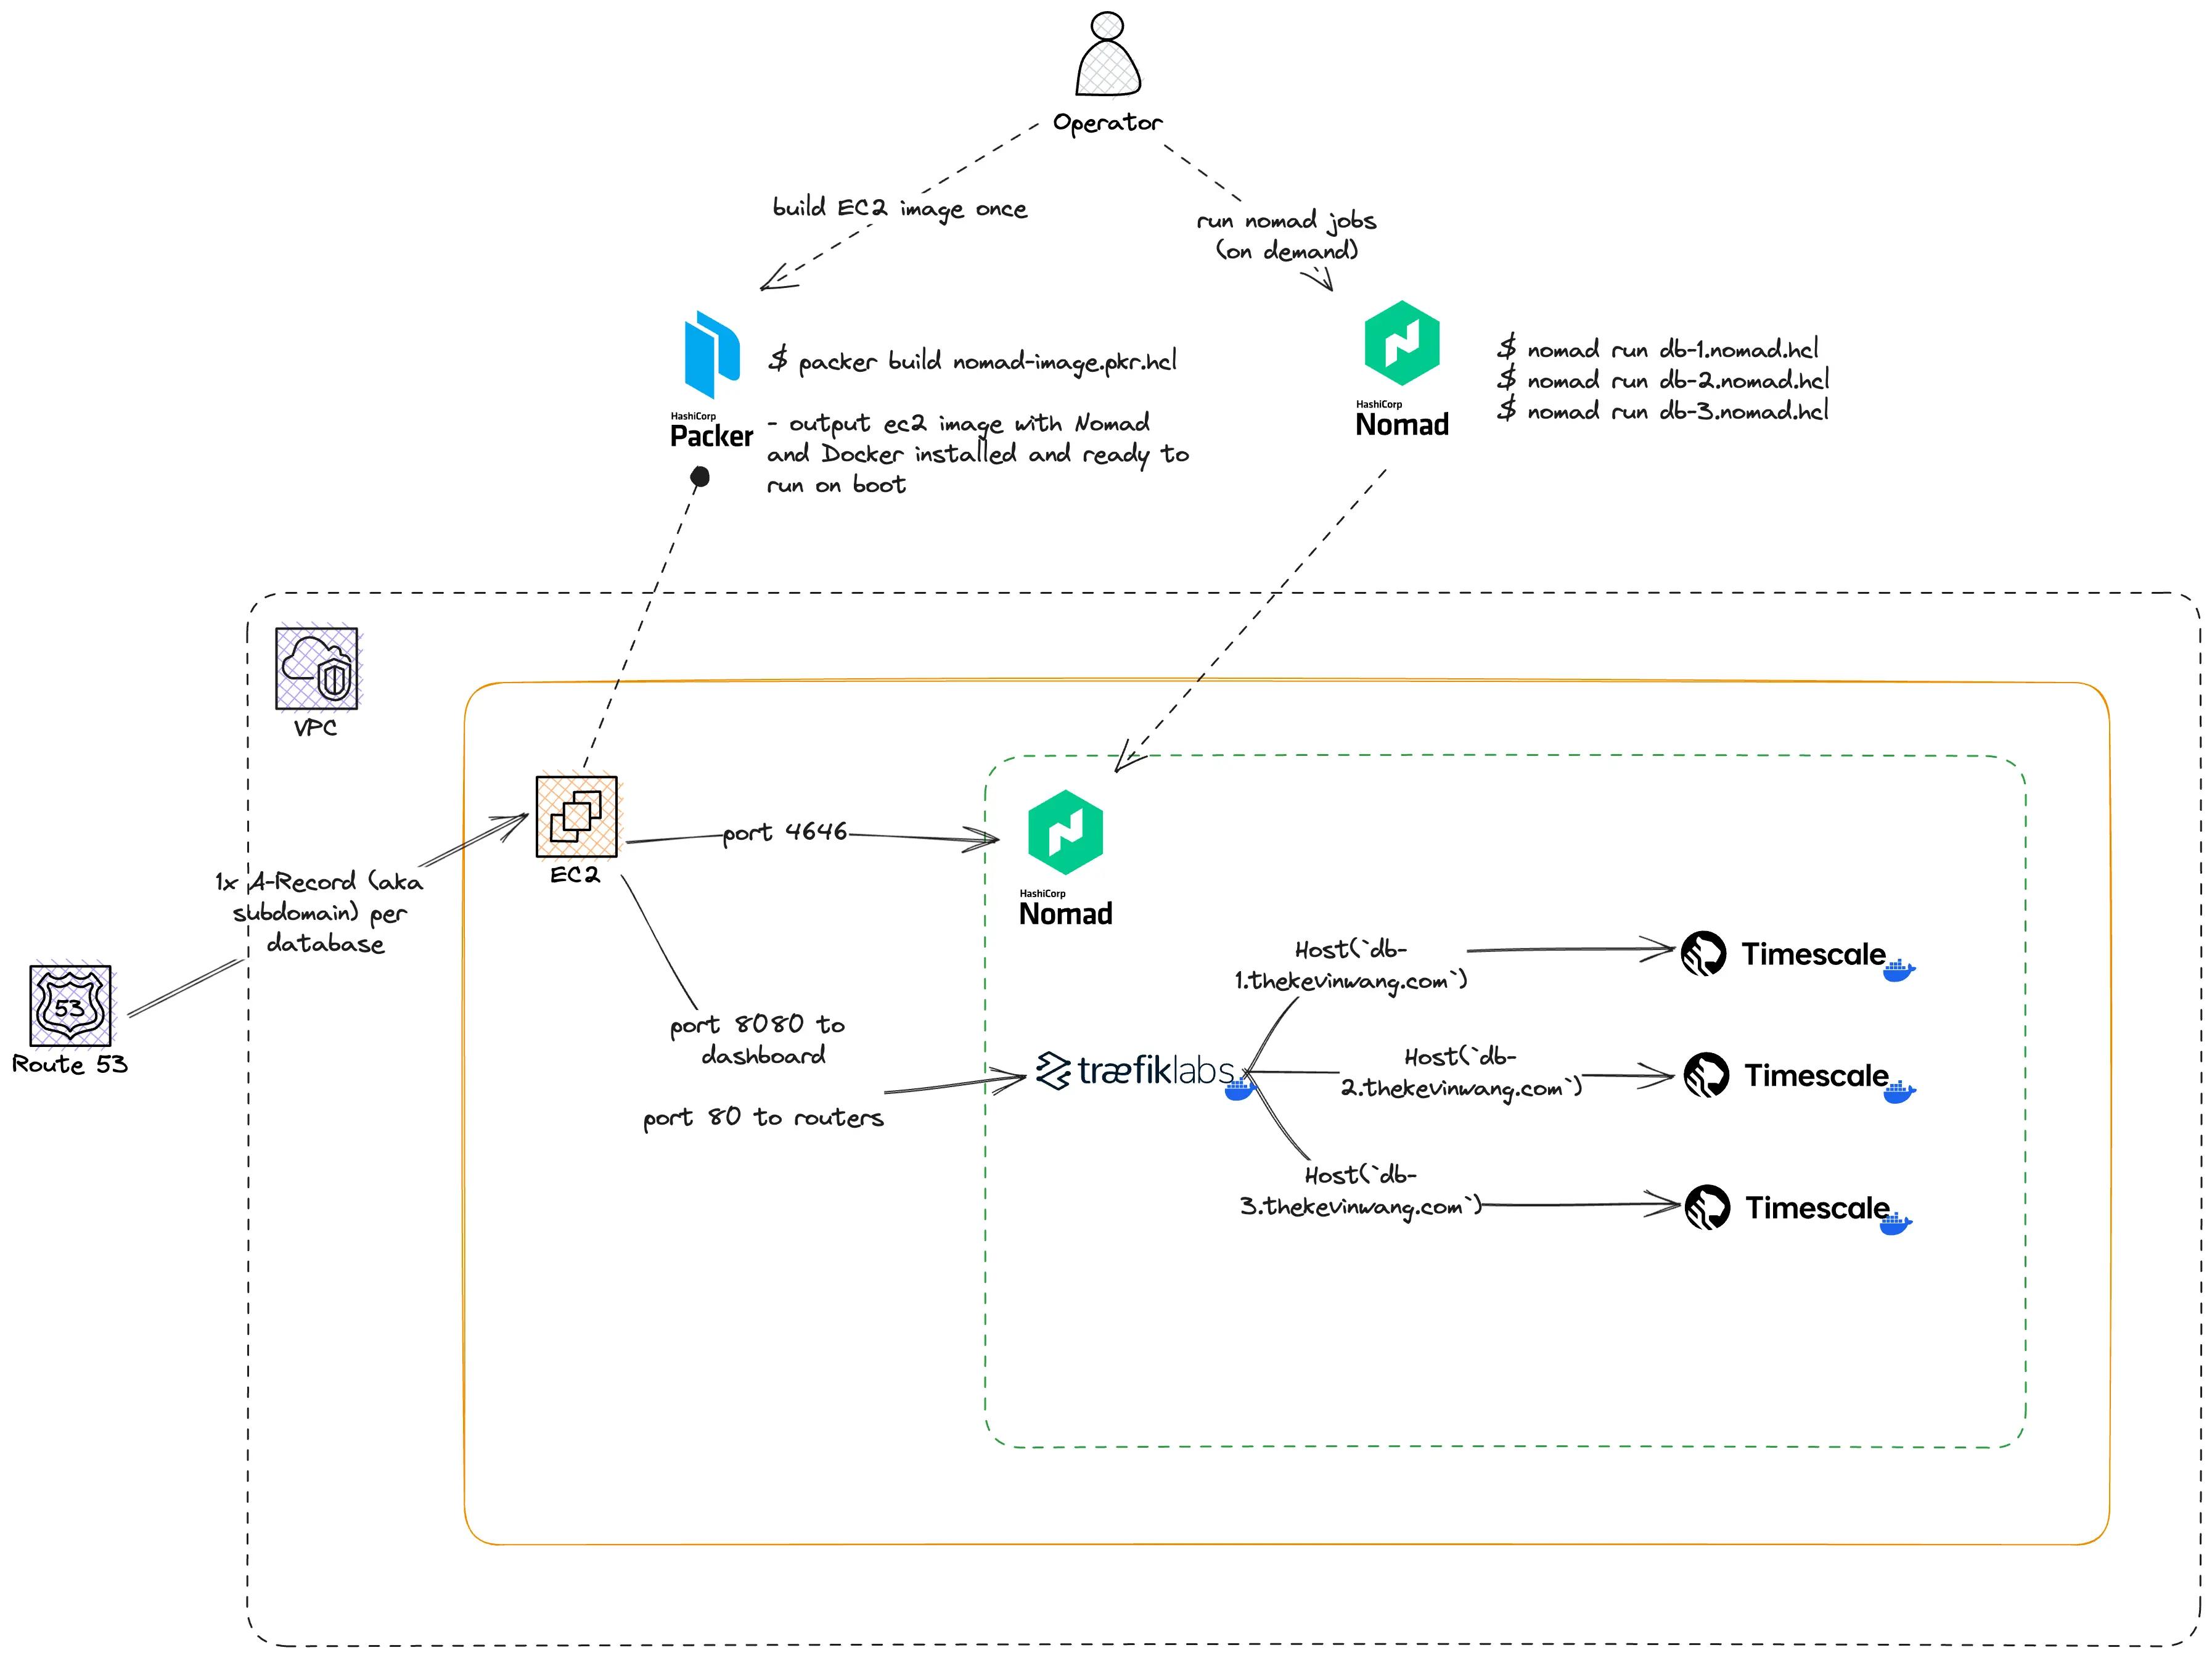
Oh, and did I say that this is not intended to be used in production workloads? ... This is not intended to be used in production workloads.
Real world use case#
This effort is really just an alternate timeline of a project that I shipped: migrating my team off of Heroku.
Backstory
At HashiCorp, one of the projects that I owned and delivered in Q1 of 2023 was moving our team off of Heroku. This came straight from our CTO Armon, relayed by my director, Kyle.
There was a one Heroku workload — a non-production one — in particular that needed a migration plan. The Heroku part involved per-pull-request API and database pairs, which backed per-pull-request Next.js frontend deployments. The frontend deployments were unique previews of HashiCorp Developer Tutorials which included close to one thousand statically generated pages.
It was in migrating this workload that I identified a fork in the road:
- Create a migration solution through dogfooding our own products, like HCP Waypoint, which was in internal alpha at the time.
- Create a migration solution but do a net-reduction of our infrastructure footprint. (Hat tip to Bryce for the nudge in this direction.)
Pragmatically, I proceeded down path #2. This was an overall simplification that involved some critical lateral thinking. The solution, which is still running smoothly today, was to run our Next.js build process entirely on GitHub actions and upload the statically generated assets to Vercel. The API and database were able to be run as service containers that really only needed to be alive for the duration of the build process.
This write up is effectively what likely would've happened if I had proceeded down path #1 from above.
Play by play#
The play-by-play of how I got this working. Pardon me if the language starts to get inconsistent. Writing is not my forté and I always find myself unintentionally alternating between a reflective post and something like a how-to guide.
Prepare AMI#
This part is optional as you can ssh into an EC2 instance and install
everything manually, but I strived to codify as many moving parts as possible
into some semblance of a system, as previously mentioned.
I used Packer to build an Amazon machine image (AMI) with Nomad and Docker pre-installed and ready to run on start up.
-
Given the following file, run:
packer build ./packer/nomad.pkr.hcl../packer/nomad.pkr.hcl
Note on security
This AMI runs Nomad on boot with ACL enabled, which requires requests to the server to be authenticated.
This also allows running nomad acl boostrap, once and only once, to generate a token (look for Secret ID)
that can be used to authenticate with the Nomad server.
Without ACL enabled, anyone who has access to the Nomad server can run arbitrary, potentially malicious
workloads, like via raw_exec.
Use export NOMAD_TOKEN=[[$NOMAD_TOKEN]] to set the token in your shell.
Run EC2#
Here is a single file Terraform configuration
that launches an EC2 instance with the AMI created by Packer. This requires
that AWS credentials are set in your environment, which can be quickly done
with aws configure or verified with cat ~/.aws/credentials.
- Given the following file, run the following commands:
terraform init- basicallynpm installfor Terraformterraform plan- view the proposed changes- it should say "Plan: 2 to add, 0 to change, 0 to destroy."
terraform apply- Grab the outputs to either
sshinto the EC2 instance or setNOMAD_ADDRand interact with Nomad from your local machine.
This option is great as you can conveniently destroy the EC2 instance and security group
with terraform destroy when you're done — No click-ops required!
Note on security
The security group created in this Terraform configuration allows all inbound and outbound traffic, purely for simplicity and demonstration purposes. You should absolutely opt for more restrictive rules in a production setting.
At the very least, the security group should only allow HTTP traffic on the ports that Traefik and Nomad run on, and PostgreSQL traffic on the port that PostgreSQL runs on.
What nomad command is being run?
If ssh'd into your EC2 instance, you can view the systemd file
that Nomad creates post-installation. Run
cat /lib/systemd/system/nomad.service to see the start command.
ExecStart=/usr/bin/nomad agent -config /etc/nomad.d
Ref: Source code
Verify Nomad#
From your local machine, without having to ssh into the EC2 instance,
you can set NOMAD_ADDR and use the nomad CLI to verify that Nomad is ready:
Expect some output if the server is ready and reachable
View the Nomad UI#
View the Nomad UI @ http://[[$EC2_IP_ADDRESS]]:4646/ui/jobs
When starting the nomad server, without -bind 0.0.0.0 or bind_addr being
set in config files, the Nomad UI will run at 127.0.0.1:4646 which is the
"loopback address" and will not be accessible from the public internet.
Run Traefik#
Traefik is a reverse proxy that will serve as a front door on the EC2 instance. It has a full integration with Nomad, and through a relatively simple — but hard to know if you're right — tag syntax, Traefik can automatically discover and handle routing to all your services allocated by Nomad. My non-service-networking mind cannot comprehend this magic.
-
Given the following Nomad job spc, run:
nomad run ./nomad/traefik.nomad.hcltraefik.nomad.hcl
If the deployment succeeded, the Traefik dashboard should be ready at
[[$EC2_IP_ADDRESS]]:8080
Run a few databases#
This is where the fun starts.
I use a single Nomad job spec, and modify it slightly before running new Postgres instances.
I modify a few key values like the job ID ([[$POSTGRES_JOB_ID]]) and hostname ([[$HOSTNAME]]) Traefik rule.
Nomad job IDs, like postgres-1 need to be unique, and I haven't yet figured out how to
run multiple jobs from one Nomad file, hence pre-run, manual modifications.
-
Given the following Nomad job spec, I modify the highlighted values, then run
nomad run ./nomad/postgres.nomad.hclfor each new database. In theory, this could be repeated for an infinite number of databases... I think../nomad/postgres.nomad.hcl
tags explained:
job[id].group[group].serivce.tags
The tags on a particular Nomad service will be detected by Traefik,
and they'll enable the Traefik router to forward an incoming request to the correct
underlying service.
Most notably in this job spec, the tags tell Traefik
to route requests with the postgres:// scheme and the hostname, [[$HOSTNAME]],
to the proper database associated with the job spec itself.
Create A records#
The last piece here is to ensure that each database's unique hostname actually exists.
I already had a domain name (thekevinwang.com) and Route53 hosted zone
that I could add additional subdomains to, so I may gloss over some details.
For my dashboards, I routed
nomad.thekevinwang.com to the EC2 instance, and relied on ports :4646 and :8080
to view the Nomad UI and Traefik respectively.
For each on-demand database, I created an A record that pointed to the EC2 instance,
and made the subdomain match the hostname value in the
traefik.http.routers.postgres.rule=Host(`[[$HOSTNAME]]`) tag.
I need to figure out how to automate the synchronizing of hostnames in A
records and the Host tag in the Nomad job spec since this part feels quite
fragile.
-
Given the following JSON blob, I run:
$ ~/ -
JSON blob. For demonstration purposes, there are only two database hostnames in here, but you could add more, do some templating, or even use multiple files.
./route53.json
The test#
If everything is setup correctly — networking, databases, nomad jobspec tags, Route53 A Records — you should be
able to run psql postgres://[[$POSTGRES_USER]]:[[$POSTGRES_PASSWORD]]@[[$HOSTNAME]] -c "SELECT \* from NOW()" and get a response from each of the unique databases.
For me, it worked! See this Twitter/X thread from 09/22/2023 for reference.
Conclusion#
Finally being able to implement this felt pretty epic. I know this isn't a viable approach for any production workloads but it feels like a pretty monumental breakthrough and huge addition to my generalist skillset as an engineer.
And, not that it was my intention, this feels like a significant personal inflection point towards platform engineering.